Editing Footage Together

Through the project so far we have certainly come across obstacles, having to change the file sizes using Photoshop on each image etc. However we have decided to edit separate pieces of footage to see what works better, the stop motion images or the filmed light images. We also needed to change the filters of the images and colours that they include through After Effects and Photoshop to see what works out best.
Rachel is continuing to work on the 3D storage box to try to insert the footage into the box and ensure that it looks aesthetically pleasing together as a composition despite the real footage and 3D being very different techniques. In the meantime, I have begun to record some clicking noises as Foley for potential sound effects for the footage that we decide on, and I have been editing together some stop motion as well as real time sequences to see what we as a group prefer and hopefully our group meeting with our peers will provide some useful feedback for us to decide what looks best and is most effective out of the stop motion and real time techniques.

In addition to this, I have also edited some of the stills that we shot during the production of the footage for potential handouts to the client as well as helping us to build up the visuals of the composition that will be inserted inside the box.
Through the experimentation of the two techniques of filming and of stop motion, we have begun to prefer the filming technique as it's shorter and more effective however we have also discussed making a longer version of the bumper for the stop motion to take place.


Dollhouse Production

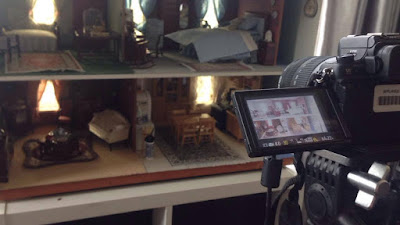
DaRachel setting up the camera
Day 1.
With production of the box going well and us both plotting the measurements of the footage in the boxes, we have managed to begin filming now that I have decluttered, cleaned and put the dollhouse furniture back in place. Rachel had managed to collect some lighting and a tripod from home, whilst I have taken a camera out from Uni in order to get going with our filming to ensure we keep to our time plan and ensure that there is plenty of room for trial and error as this is going to be an important part of us getting our perfect shots.
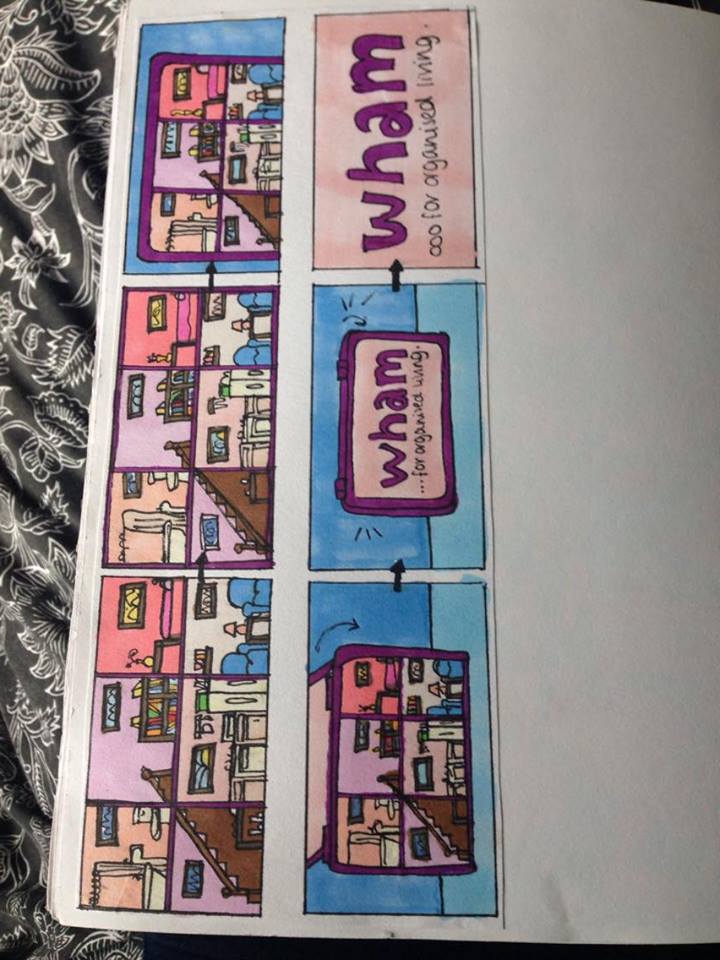
We decided to shoot some stop motion pieces of footage using the camera, as we had the idea of having cluttered areas of the dollhouse reappearing into tidier areas and clicking with box noises as it did so.
props and set design
 We produced these pieces of footage within roles that naturally formed between us. Rachel suited the camera work and directing of the filming, as she has technical skills in terms of focusing and balancing the colours within the frame, whereas I controlled the lighting elements and the small intricacies of the props and stop motion movements of the footage. In addition to the stop motion performances we produced some close shots of the dollhouse rooms, to trick the audience into a false sense of security with knowledge that they're in a dollhouse, whereas really it will reveal the fact it's a storage box and that the rooms metaphorically represent the aspect of a home life stored away.
Adjustments to props 
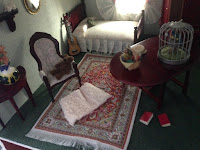
Example of 'Clutter'
There were some problems that we have faced in the filming of the footage, and that is with the camera footage being grainy through lack of light, therefore we chose to film the majority of the footage in the peak time of natural light, such as in the earlier hours of the morning and afternoon. However, some problems such as overcast skies etc. did delay our production, but it was important for us to replicate the aspects of natural light coming through the window, as this was an aspect that we wanted there to be in our footage. However, we wanted some vacant movements of light to replicate the aspects of light travelling through windows alike to that of your home. We had some UV lights that we were able to use to shine through the windows off the walls to look interesting and like a vehicle was passing, this was an effective technique that we felt should have been carried through to all the rooms, and hope that the footage is effective when edited.

As part of our research we also found this piece by Anton Mishenin on Vimeo, and were inspired by the lighting used and the aspect of lights flooding through the windows, using the lights as the movements in a stationary room. I think this could be an effective overall composition if we manage to replicate the style as it imitates the movement of the sun and lights in a  real life home that we may not necessarily see or notice. We are using UV lights to replicate movements of the sun in the windows of our doll house in order for a similar effect to occur.

Doll House from Anton Mishenin on Vimeo.
Day 2.
Whilst reflecting on yesterday's production of footage, we were able to look at what did and didn't work in terms of the compositions, lighting and movements etc. We revisited the shots in the room, making sure that we concentrated on certain elements such as the gaps in lighting, as some of the shots were blurry or grainy so we decided to reshoot them but rethink the lighting. We filmed the bottom room first as we knew the natural light wouldn't light the room as well as the others, so needed the best of the sunshine, whereas we used extra lights also to illuminate certain areas.
We also decided to start to gather the footage together so that we could make the most of what we have, and delete what didn't work as well as other pieces that we had made previously.
In addition to this, we also worked on the lighting elements more in terms of shining it through the window, as we liked the effect it created but wanted to do more. Using small UV lights and one larger one, we were able to capture lights passing through the window alike a normal house, inspired by the research we had previously developed. We also developed the wide shot for our piece as this was the shot that finalises the very element of the house actually being a storage box, we tried to make this precise, however we may have to reshoot if the footage doesn't quite match up to the 3D box created.

Box Production

Production of the 3D Storage Box
Basis of Idea
Since beginning the production with Rachel, we settled on some roles when it came to filming the actual footage for the dollhouse idea. The box is going to be a 3D replica of a similar Wham! Box that we have seen and decided to work with originally for the idea. Rachel is going to conduct the making of the 3D box whilst I will be in charge of the editing and stop motion side of the footage production. Rachel finished producing the box and we're both really happy with the results.
We have worked out that with the different measurements of the box that we will need to have 4 main rooms and side areas for the stairs, which allows us to be able to see how the dollhouse would actually look rather than the original idea which was to split it into six separate sections for all the different rooms. We are hoping the footage will fit in nicely with the aesthetic of the plastic Wham box that she has produced and that it will run smoothly as an idea as a whole.
Creating the box through the aspect of using cinema 4D was a challenging aspect as a basis of the idea, so we knew that it was a good choice to collaborate so that we could separate certain roles in terms  of who does the Cinema 4D software and who does the aspects of After Effects and where these skills cross over.
Rachel used the alternate material settings of Cinema 4D to ensure that there was some texture to the object in order for it to look like the storage box that we had decided to base our idea on. I believed that it was important for the box and the footage that we produce to look like they suit each other and are of a similar aesthetic despite being completely different pieces of footage and techniques.
 It was also important to ensure that the measurements of the dollhouse matched up with that of the box, therefore as Rachel did the box on Cinema 4D, I cleaned and set up the dollhouse for us to eventually film in, as well as measured the dollhouse to ensure that the rooms filmed match up with the measurements of the box, this way the two techniques will hopefully edit together well and produce a nice outcome.

Dollhouse Research

In order to gather some information on the Dollshouse and other ones around it, we have taken initial photographs of the dollhouse as well as some research into existing animations themed around the aspect of a dollhouse.


Ikea
Through the alternate research that we conducted, Ikea's advertisements kept cropping up throughout, the aspect of using a dollhouse as a connection to designing the house the way you want it to look. Something which seems effective with the production of the pieces.

TalkTalk Advert
Although the characters again don't necessarily link to what I've been doing the effect of this I think is interesting.

Collaborating for Wham

Due to the 3D element of the box needed to be created, Rachel and I decided to collaborate on this idea, as it is a complex idea for one individual person and we feel our separate skills can help to develop this idea better. Rachel is currently mocking up a 3D version of the box we would like to use, based on the brief measurements I took of the dollhouse that we shall use, she does this whilst I try to visualise further storyboards of our idea and how we want certain elements to move.

The basis of the idea is to have a series of rooms with zoomed in cuts of each room, then becoming a wide shot of the dollhouse within the grids, it will then have the lid close on the box to reveal the end graphic. We also would like to produce some text that will relate to the 'home' element of the idea.
In Order for our collaboration to work well with the deadline approaching, we decided we would ensure that there was structure in the production of time management so that each role was fulfilled well between us both. I have produced a timetable of things that needed to be done on each of the days and what we intend to do to complete the project in time.


Doll House Idea

Similar sectioned box
Overall Dollshouse 
When looking at one of the boxes in the Wham collection, I noticed that one of the boxes was sectioned out to be like a house, as to me it looked like the boxes could actually be rooms. Coming along from this idea, I decided to photograph a dollhouse I had at home, as this reminded me of the overall layout of the boxes being a house. I intend to produce some more detailed storyboards of the idea and research into what it could be and how to involve the dollhouse in more of a way.
Kitchen of Dollshouse
I have decided to photograph the dollhouse I have at home, as I initially thought this would be a nice thing to film or work from, I'd like to produce a series of drawings to work on of the rooms I take photographs of in the dollhouse project.
 The idea would be to use an open Wham storage box with the compartments to relate to the open plan style of a dollhouse, with the rooms all lining up. The kitchen would be in the 'downstairs' bottom section of the box, with the bedroom at the top etc. I can visualise it being a close up of the rooms in the dollhouse, and then zooming out to reveal that the actual house was in fact in a storage box after all, revealing the graphics of 'For Organised Living' however, I feel like there should be an additional slogan to mix in the living part of the dollhouse so that it all ties in together as an idea.
Close up of table
 I think first of all learning about the actual layouts of homes and dollhouses would be a good way to research the idea further, for it to look realistic, and the audience to immediately know what is happening.
 I think taking photographs of the dollhouse is helpful as it helps to see whether I could use it as the animating tool for this project, or simply use it as a form to animate from and research into. Another technique could be drawing from the dollhouse and using it as a study to work from.

'Wham' Live Brief


We were briefed by John and Jack from Holden's, who explained their own agency and their own projects and set us the 'Wham' brief, a brief for us to make the aspects of 'Wham' storage boxes more appealing. I have looked into the actual aspects of the pieces involved, the colours of the boxes etc. and how these could be used in the potential idea.
In my sketchbook I have written up and planned some additional ideas that I'd love to further explore.  These ideas explore the shapes, colours and overall nature of the boxes, and I feel that their motto 'For Organised living.' is an important end message as Jack and John had made clear that they'd like the end motto and logo graphic to be shown.

I think from the giving of the brief, there are certain things that have been known to be important and these things are:
  • The fact that the audience is first time buyers, and aimed at adults, so certain things have to  be considered like the fact that they are likely to have the boxes to organise new homes and places to stay.
  • Colours used, mostly bright or primary colours so these should be used within the animation.
  • The fact that the shapes of the boxes is mostly square or rectangular, there are some with wheels etc. 


Final Ident

I am happy with the overall result of my final ident, however I feel that I could have done more with the lighting and colours of the film, which is something that I will improve for my portfolio, but wasn't able to do within the timeframe.


I like the intricacies of the crime-board that I've produced but I'm not a fan of the quality of the image as it is slightly more blurry than I thought, but this could be more to do with the lighting, however I did set up some soft lighting equipment in the reshoot of the film to ensure this wasn't as bad as some of the images became quite grainy looking when on the film. I had edited the images previously so this was a good way of converting what is thought to originally be a news article into the aspect of the Film4 Logo reveal.
Using the tripod on a sliding rail also helped with the speed of the zoom in and the transition into the Film4 in the strings. I like the angles as based on my 3d model of what I wanted the board to look like, it does look well with the lining up revealing the big 4 around the actual text to be the logo.

Setting Up & Filming


Setting Up the Crimeboards
Now that I have successfully produced all the props and evidence for the crime board, I started to arrange the pieces onto the board and set up the filming. In order for a good form of filming, I have decided to use the camera on a fixed runner, allowing me to zoom into the elements on the board without using the zoom tools on the camera itself.
The composition of the crime board is important, I have planned where the shot will be at the end of the logo reveal which is the bottom left of the crime board, so I have to be careful as to where I position the pieces on the board in order to not distract the audience's attention off the logo that will begin to form throughout the line elements that are on the board.
In addition to this, I also wanted each element to look believable, and alike my research that I looked into on crime boards and crime dramas in order to have evidence to support the documents I produced. The bits I produced on the board are shown below, each with informed details and influence from crime dramas that I'd seen myself:

  • Mugshots- taken of my two friends, one playing the 'victim' and the other the 'suspect' in the case that is developing on the crime board.
  • Witness Statements and forms- I printed off some authentic witness statement forms and got my peers to fill them in with genuine stories to allow the authenticity to shine through, it's important for me to do so in my pieces.
  • Fingerprint records- I actually collected some of my friends fingerprints using an ink pad and paper and then transferred these prints onto original fingerprint documents for my own authenticity in the work.
Each element I think although intricate and time consuming, adds to the overall appearance of the work and makes it most effective. Proportion was also important in this project, as I wanted it to look like the pieces on the crime board were larger scale, so I did some intricate notions such as making the receipts etc scaled down to look more in proportion to the rest of the documents on the board, adding continuity and authenticity to the piece well. I had previously made a prototype of the crime board as this helped me to develop further as to what I'd need to include and change for the final crime board.

Filming
I really enjoyed the aspect of filming the set I created, as the measurements of the zoom etc worked brilliantly, however there were some problems I had to work around such as bad lighting as this would make the text and photographs appear grainy on the film which let down the quality of the footage in general. I did two different shoots, one with natural light and the other with artificial lighting that was applied and I much preferred the extra lighting as this really enhanced the text rather than making it blurry.
I also encountered a problem with the size of the push pins in the piece as these when on camera were found to not be in proportion to the rest of the pictures and images, so I changed them for sewing pins as these were a lot smaller and easier to work with.